Beware, this is a nerd writing. Don’t say I didn’t warn you…
With digital camera, the world of photography have become very complicated for gear-geeks. With a new top of the line DSLR being released each year, followed by new software, lenses etc. there is more than enough to drool over. I feel digital photography is hard to grasp because it is impossible for people to grasp what the essentials of the cameras are. That is why I like to shoot film form time to time and get my hands dirty in the darkroom.
Studying classic cameras, such as the Kodak Brownie, I marvel at how simple it is; a lens (that’s one lens-element, one!) a shutter blade, an aperture (in some cameras a metal plate with two different holes drilled into it) and some rolls to keep the film in place. That is all it took to shoot great pictures, why can’t digital cameras be that simple…?
 |
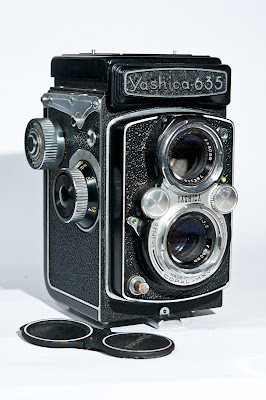
| A 1950’s TLR Yashicaflex |
To study the simplisity of cameras further I set about to make one myself. Now you probably think I’m about to go on and on about a tin-pinhole camera. No, I want to go a little bit further (although I have made a pinhole cap for my DLSR as well). My project was to make a fully functional Twin-Lens Reflex (TLR) using 120-film out of LEGO bricks. James May would love this…
LEGO-bricks, a danish construction toy, are the perfect material for experimental desktop construction. It is tough enough, all angles are right and it can be rebuilt and modified easily. But, they are not light-tight, an issue which became evident.
At this point, I have to mention Cary Nortons Legotron Mark I project, as a great source of inspiration.
Some basics: A TLR is a camerasystem best know for the Rolleiflex, and uses two identical lenses, one for the viewfinder and one for exposing the film, as opposed to a single-lens reflex that have one lens do both jobs and just flicks the mirror open when you press the shutter. The reason I chose the TLR-principe for my project is to minimize moving part complicating the structure.
Speaking of complications, there are a few. As opposed to Nortons Legotron using 4×5″ sheet film in special holders with a lens with built-in shutter and aperture, a by far simpler construction, my camera was to be built around 120 roll film, meaning I needed a rewinding system and a light tight chamber, a shutter of some sorts and a way to control the light with an aperture. One at a time:
 |
| The lens box with the camera in the background. |
– The lens: I decided to use the lenses out of and old set of binoculars I had lying around. The lenes are identical, making them perfect for a TLR. I then built the lenses into a “box” that can be slid in and out of the camera, regulating the focal distance thus focusing the image. The leses have to be paralell, so that the focal distance is the same for both the viewfinder and the film.
– The aperture. Perhaps the easiest, or the one problem I put least energy into. I solved it by making a plate with a hole in it (a single technic-piece) that can be placed in the camera.
 |
| Looking down the viewfinder. |
 |
| Inside the camera, with the shutter half open |
 |
| The film holder |
– The shutter: The shutter needs to be moving, and it have to expose the film to light evenly. If I had made a sliding door that opened and closed to the middle, I would expose my film in a gradient making the middle overexposed and the sides underexposed. I solved it by making a plate, one brick wide, with a slot in the middle. The slot passes over the film plane, and expose it evenly from side to side. The problem is I ended up with a plate sticking out of the camera whenever there is a film in the chamber.
– The viewfinder: The viewfinder requires two things; a mirror and a matte ground glass. I placed a square makeup mirror (donated by my girlfriend, thus completing the build, thank you Frida!) inside the top of the camera, angled 45 degress to reflect the light from the top lens directly up. The matte was cut out from a frosted piece of plastic that we use at work as front pages for photo booklets.
 |
| The rewind lock mechanism |
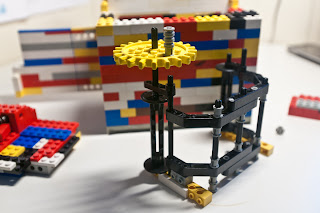
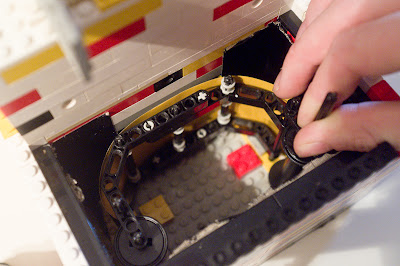
– The rewind mechanism: The last moving part. I used brackets and rods from a technic kit to make a holder that both holds the two film rolls in place, and guides the film towards the shutter plate for exposure. I also had to make a rewind lock, that prevents the film roll to unroll itself backwards in the chamber after it is wound forward. Again, technic to the rescue, it was made using a pointed piece supported by various springs locking onto the teeth on a cogwheel.
 |
| The film chamber and -holder. A lid goes on top, with the rewind lock on it. |
 |
| CAD-drawing showing a long section of the camera. The arrows demonstrate the image entering the two lenses. Click to enlarge |
 |
| Front view with lens box installed. And yes, duct tape has been involved in the build. |
 |
| Rear view with shutter plate sticking out at the left side. |
 |
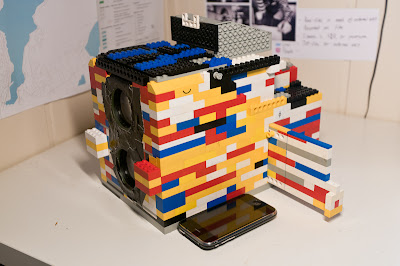
| Side view with an iPhone 3GS to compare the size. |
The camera is operated as such:
– First, looking down the viewfinder, the image is focused by sliding the lens box back and forth, thus changing the focal point. The lens is, by the way, a tele (dunno the focal lenght), so paralax is to be expected.
– The film is exposed by sliding the shutter plate through. Yes, at this point you do get loads of blur from shifting the camera, and yes, the shutter speed is not exactly 1/125. The shutter speed is actually more or less ballpark, depending on how fast you slide the plate through.
– The film is then rewound by turning the cogwheel on the top about two full times. The rewind lock clicks as you go, stopping the film from going back once it is rewound.
Once the picture is exposed, I can let the camera stand on a table for a few days, but as I don’t expect the film chamber to be light tight (even though it is covered in duct tape on the inside) I expose a full roll of 10-12 frames at once. I have designed a lock for the shutter plate; a peg sliding into the plate locking it from being pushed through the camera. When there is no film in the camera, I take the shutter plate out of the camera to ease storage.
 |
| The first proper picture from the camera. |
 |
| My girlfriend often falls victim of my photographic experimentations, as she is an easily accesible model. Being a talented photographer herself, she hates it! |
These two pictures came from the second roll of film I exposed. A roll that locked inside the camera so only these frames where good. The first roll was all blurry because of a badly calibrated viewfinder, and had stripes on them from light leaks in the shutter plate, issues I corrected before shooting a new roll.
Well, there you have it. Cameras can be made simple! Something to think about when you buy your next helluva-lot-of MP DLSR with built in HDR and smile-detecting-auto-trigger.
PS: The name of the camera is of course Legoflex, model B1 (Brick 1). If there will ever be a B2 it will be a 35mm SLR with a Nikon F-mount!


Fantastisk. Hvor lang er batterilevetiden? Ånei! Det er ikke en bekymring engang! Jeg tar to! Hva er prisen? 🙂
so cool.
sweet!!
Could someone now try a 4K, 16 bit, Super-35 chip Digital Video Camera?
Please…
awesomeness!!
pure awesomeness
Utrolig kult! Jeg husker at du drev å jakta på et firkanta sminkespeil ja, så bra at det ble ferdig – og virker:D
Sweet lord, CF. Du er hakket over nerd!